Showing posts with label Sewing. Show all posts

Tuesday, January 12, 2016

Homemade Christmas Gifts 2015...

Here's a round up of my homemade Christmas gifts this year for the kids.

Cannon - Noah's Ark animals
This has been an idea a long time in the making and I'm only semi-disappointed with myself that I didn't get the ark made in time. Another year...another homemade gift. This year, he got the animals; 12 sets, 24 in total. Based on a set by Holztiger - a company from Germany which I talked about here.
Homemade Gift: Wooden Noah's ark Set
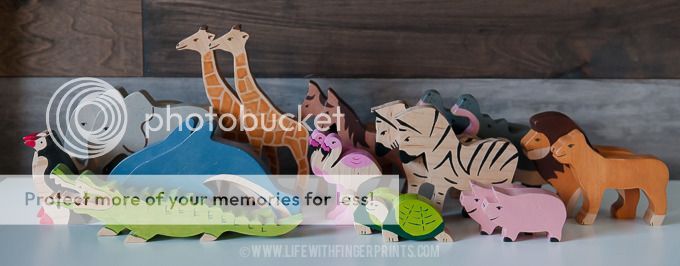
My patio was a disaster for far too long. This was a labor of love and I was counting my lucky stars that I had all my fingers in tact when I finished. Scroll saws can be a little intimidating! They're made of 1" hard maple which was a little difficult to cut out but they'll be much more durable than making them out of pine. I spent many weeks watching Survivor and painting all the animals with basic craft paint (all of which was left over from a homemade gift last year, the nativity puzzle). I finished them off with a couple layers of clear coat and called it good.
Homemade Gift: Wooden Noah's ark Set
They turned out better than I expected and I'm pretty much in love with them. So is Cannon.
Homemade Gift: Wooden Noah's ark Set


Bennett - Wooden Robots
I found these darling robots (Ollibots) at Caravanshoppe.com. These require absolutely no skills. I purchased the digital file which gave me the artwork (printed them at staples) and all the instructions as well as the part numbers to buy from an online hobby store for all the wood pieces (precut).
Homemade Gift: Wooden robots, Ollibots, from the Caravanshoppe.com
They suggested different options of attaching the pieces together - I went with low-profile industrial strength Velcro from Amazon and it's worked like a dream.

Homemade Gift: Wooden robots, Ollibots, from the Caravanshoppe.com

You can mix and match to your heart's content - and Bennett has!
Homemade Gift: Wooden robots, Ollibots, from the Caravanshoppe.com

Hunter - Lego Print
Check out Hunter's Lego artwork gift on a previous post.
Homemade Christmas Gift; Lego Wall Art

Hallie - Fancy circle skirt
I'm realizing the older my kids get the more creative I have to get with their homemade gift. It's much easier when they're younger!

Hallie was in need of some skirts. Typically, I'm able to find something at a store that fits her just right but we've had some trouble lately. She getting taller and she has a fairly skinny waist. We couldn't find a skirt long enough with a small enough waist. I turned to danamadeit.com and followed her circle skirt pattern. It was so easy, I made one for her to wear before Christmas and surprised her with another on Christmas morning. I'm tempted to make one in my size.
Homemade Gift: Girls circle skirt
I'm ready to start brainstorming this year's gifts. (aside from Cannon's ark which has already made the list!)

Check out more homemade gifts from previous years:
Homemade Gift Paper RollHomemade Gift: T-Shirt QuiltHomemade Gift: Wooden Nativity PuzzleHomemade Gift: Bean BagsHomemade Gift: Gospel ABC BookHomemade Gift: Canvas QuoteHomemade Gift: Wooden Super HeroesHomemade Gift: Kids Apron
Homemade Gift: Photo Book

Thursday, June 18, 2015

Easy Pennant Banner...

Here's my latest post at HowDoesShe.com - it's not too late to make some 4th of July decorations!
Easy Pennant Banner made with oilcloth fabric and bias tape
One of the easiest decorations that is in my holiday arsenal is the pennant banner. I use them for holidays, birthday parties, wedding and baby showers and more – I’ve got a lot sitting in my closet. And I think I’ve used just about every material to make them: Wood, paper and fabric. Wood is heavy and hard to hang. Paper is the easiest – but buying cute scrapbooking paper isn’t always cheap. Fabric is my favorite because of the durability – but its also the most time consuming because you have to finish edges (unless you’re going with burlap and frayed edges is expected.)

But here’s my secret weapon- use oilcloth fabric and you don’t have to finish the edges and they don’t fray. You get the best of both worlds. Here’s a decoration you can hammer out in 20 mins.

Buy some festive oilcloth – think washable tablecloth material. I’ve seen some fabric stores with great selection but it’s hit or miss. I usually buy oil-cloth online – even then selection is not near what it is for fabric.

Easy Pennant Banner made with oilcloth fabric and bias tape
Easy Pennant Banner Tutorial
Cut strips of fabric (mine were 6″) and then cut out the shapes of your choice. Triangles are always a safe route. Squares are fun. Sometimes I mix it up like I did for this patriotic banner and mix shapes.
Easy Pennant Banner made with oilcloth fabric and bias tape
The next secret weapon to make this project a breeze: extra wide double fold bias tape. It’s double fold which means all the edges are finished.
Easy Pennant Banner made with oilcloth fabric and bias tape
I like to lay the tape out and line them all up so I can adjust what needs to be adjusted. Then slip your fabric in the tape and sew from one edge of the tape to the other. I’ve done enough of these that I usually pin the first flag and eyeball the rest.
Easy Pennant Banner made with oilcloth fabric and bias tape
You’re done. I wasn’t kidding about this being a 20 min project. 15 minutes of cutting. 5 minutes of sewing. It took me longer to get a step stool and hang it than it did to make it.
Easy Pennant Banner made with oilcloth fabric and bias tape
Easy Pennant Banner TutorialI had some scraps and made a miniature pennant for our chalkboard. I didn’t have extra bias tape so I ran the sewing machine from one piece of fabric to the other with a half inch gap and it worked great.
Easy Pennant Banner made with oilcloth fabric and bias tape
Happy decorating!

Thursday, April 30, 2015

DIY Fabric Wall Mural...

Life with Fingerprints: DIY Fabric Wall Mural - create your own wall art using fabric, Pellon and an iron
A while back I came across a world map mural that I loved and I knew exactly where to hang it - in Cannon's room. I didn't pull the trigger for almost three weeks and by the time I was ready it was gone. I called the company and begged for them to find one in a warehouse somewhere, but they had nothing for me.

I was convinced that I wanted a large mural map to sit on the wall behind the crib.
Life with Fingerprints: DIY Fabric Wall Mural - create your own wall art using fabric, Pellon and an iron
I searched high and low and I couldn't find anything I liked as well as the one that slipped from my hands. So I improvised.

I decided to iron fabric to my walls. Yes, you read that right...iron. I've used pellon before in craft projects and it worked like a breeze. I was hopeful that I could get it to stick to my orange peel texture walls and it worked just like I had hoped.

I started out by laying out the wall to scale on my computer. (Anyone that reads this blog long enough will know that I always draw everything to scale on the computer first!) When I knew how large I wanted to make it, I carefully laid the countries in their final size out on a banner to be printed at staples.
Life with Fingerprints: DIY Fabric Wall Mural - create your own wall art using fabric, Pellon and an iron

I took some time and cut out each country. I picked out my fabric for each country, attached the pellon and then traced the country on to the pellon and cut out. It's a little monotonous to cut out the detail of every country twice - but it seemed like the best route at the time. Now that I own a projector, I would probably just trace it using the projector which would save at least one session of cutting out countries!
Life with Fingerprints: DIY Fabric Wall Mural - create your own wall art using fabric, Pellon and an iron
Once the countries are cut out, pull back the pellon and tape them to the wall for placement.
Life with Fingerprints: DIY Fabric Wall Mural - create your own wall art using fabric, Pellon and an iron
With a warm iron, slowly run the iron over the fabric and make sure to get all the edges.
Life with Fingerprints: DIY Fabric Wall Mural - create your own wall art using fabric, Pellon and an iron
The pellon attaches nicely to the wall and can just as easily be removed. I did learn this the hard way as my son's crib was next to the wall and while he was in his crib he liked to pull the edges on one of the countries. The good news is I found out it doesn't leave a residue!

It was apparent I needed to move the crib and we haven't had any problems since. I love the statement that it makes and it was a fraction of the cost of the original map mural I had my eye on.
Life with Fingerprints: DIY Fabric Wall Mural - create your own wall art using fabric, Pellon and an iron

Tuesday, December 9, 2014

Christmas craft...part 3...

Remember my love for napkin pillows? Combine that with my love for holiday decorations and we've got holiday napkin pillows!
Life with Fingerprints: Christmas Craft, pillows made from store bought napkins
These napkins were $3.19 for two at Target which makes them the cheapest pillow cover ever! And the gold and silver dots have a nice shimmer to them making them even more fun.
Life with Fingerprints: Christmas Craft, pillows made from store bought napkins
I paired them with red pillow covers we already had and our couch is now feeling festive.
Life with Fingerprints: Christmas Craft, pillows made from store bought napkins

Check out the other posts from Christmas Craft week
Christmas Crafts Part 1
Christmas Crafts Part 2
Christmas Crafts Part 3
Christmas Crafts Part 4
Christmas Crafts Part 5
Related Posts Plugin for WordPress, Blogger...