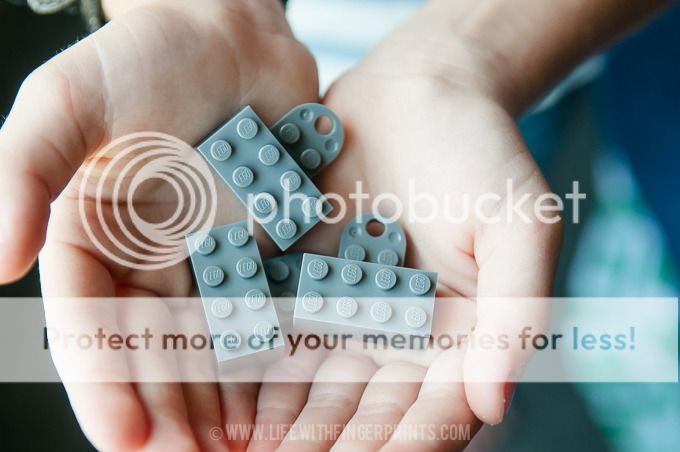
I found the perfect magnets for Hunter's magnet board. I was scouring Amazon for something or other when I was sidetracked and I came across Lego magnets - a way to display Lego figurines and artwork! (What in the world did we do before Amazon?!? I could've ran to 3 stores and never found those puppies.)
They're the perfect accent to the Lego print he has hanging on another wall.
He likes to switch out the guys - and sometimes he doesn't even put guys on them, he uses the magnets plain. Either way, they beat the boring colored circle magnets I originally picked up.
Showing posts with label Lego. Show all posts
Tuesday, May 3, 2016
Sunday, February 7, 2016
Lego Super Bowl...
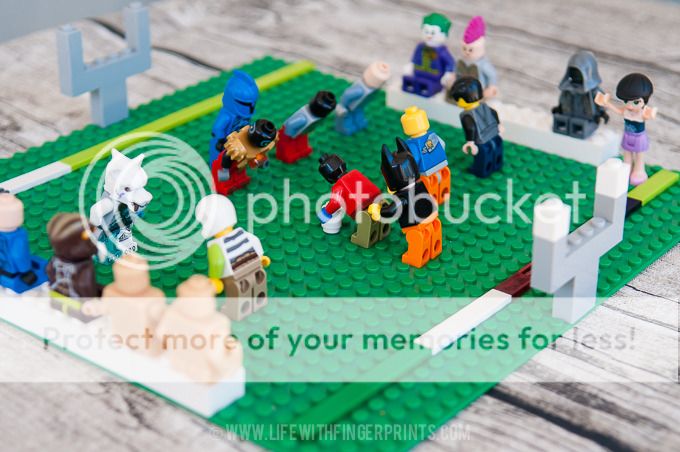
The kids were quietly playing this morning before heading to church and I could hear the Lego bucket being combed through. Shortly before it was time to leave, Hallie and Hunter walked into the kitchen carrying their Lego Super Bowl.
It had me laughing. Batman as the quarterback. The girl Lego Friends as cheerleaders. The guys on the bench, including the Joker, waiting their turn to go into the game. It was a work of art - I love the creativity of children!
Tuesday, January 12, 2016
Homemade Christmas Gifts 2015...
Here's a round up of my homemade Christmas gifts this year for the kids.
Cannon - Noah's Ark animals
This has been an idea a long time in the making and I'm only semi-disappointed with myself that I didn't get the ark made in time. Another year...another homemade gift. This year, he got the animals; 12 sets, 24 in total. Based on a set by Holztiger - a company from Germany which I talked about here.
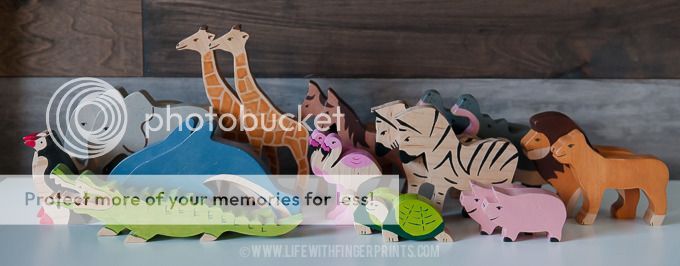
My patio was a disaster for far too long. This was a labor of love and I was counting my lucky stars that I had all my fingers in tact when I finished. Scroll saws can be a little intimidating! They're made of 1" hard maple which was a little difficult to cut out but they'll be much more durable than making them out of pine. I spent many weeks watching Survivor and painting all the animals with basic craft paint (all of which was left over from a homemade gift last year, the nativity puzzle). I finished them off with a couple layers of clear coat and called it good.
They turned out better than I expected and I'm pretty much in love with them. So is Cannon.
Bennett - Wooden Robots
I found these darling robots (Ollibots) at Caravanshoppe.com. These require absolutely no skills. I purchased the digital file which gave me the artwork (printed them at staples) and all the instructions as well as the part numbers to buy from an online hobby store for all the wood pieces (precut).
They suggested different options of attaching the pieces together - I went with low-profile industrial strength Velcro from Amazon and it's worked like a dream.
You can mix and match to your heart's content - and Bennett has!
Hunter - Lego Print
Check out Hunter's Lego artwork gift on a previous post.
Hallie - Fancy circle skirt
I'm realizing the older my kids get the more creative I have to get with their homemade gift. It's much easier when they're younger!
Hallie was in need of some skirts. Typically, I'm able to find something at a store that fits her just right but we've had some trouble lately. She getting taller and she has a fairly skinny waist. We couldn't find a skirt long enough with a small enough waist. I turned to danamadeit.com and followed her circle skirt pattern. It was so easy, I made one for her to wear before Christmas and surprised her with another on Christmas morning. I'm tempted to make one in my size.
I'm ready to start brainstorming this year's gifts. (aside from Cannon's ark which has already made the list!)
Check out more homemade gifts from previous years:
Cannon - Noah's Ark animals
This has been an idea a long time in the making and I'm only semi-disappointed with myself that I didn't get the ark made in time. Another year...another homemade gift. This year, he got the animals; 12 sets, 24 in total. Based on a set by Holztiger - a company from Germany which I talked about here.
My patio was a disaster for far too long. This was a labor of love and I was counting my lucky stars that I had all my fingers in tact when I finished. Scroll saws can be a little intimidating! They're made of 1" hard maple which was a little difficult to cut out but they'll be much more durable than making them out of pine. I spent many weeks watching Survivor and painting all the animals with basic craft paint (all of which was left over from a homemade gift last year, the nativity puzzle). I finished them off with a couple layers of clear coat and called it good.
They turned out better than I expected and I'm pretty much in love with them. So is Cannon.
Bennett - Wooden Robots
I found these darling robots (Ollibots) at Caravanshoppe.com. These require absolutely no skills. I purchased the digital file which gave me the artwork (printed them at staples) and all the instructions as well as the part numbers to buy from an online hobby store for all the wood pieces (precut).
They suggested different options of attaching the pieces together - I went with low-profile industrial strength Velcro from Amazon and it's worked like a dream.
You can mix and match to your heart's content - and Bennett has!
Hunter - Lego Print
Check out Hunter's Lego artwork gift on a previous post.
Hallie - Fancy circle skirt
I'm realizing the older my kids get the more creative I have to get with their homemade gift. It's much easier when they're younger!
Hallie was in need of some skirts. Typically, I'm able to find something at a store that fits her just right but we've had some trouble lately. She getting taller and she has a fairly skinny waist. We couldn't find a skirt long enough with a small enough waist. I turned to danamadeit.com and followed her circle skirt pattern. It was so easy, I made one for her to wear before Christmas and surprised her with another on Christmas morning. I'm tempted to make one in my size.
Check out more homemade gifts from previous years:
Labels:
Christmas,
Crafts,
Kids activities,
Lego,
Sewing
Thursday, January 7, 2016
Homemade Christmas gift...Lego Wall Art...
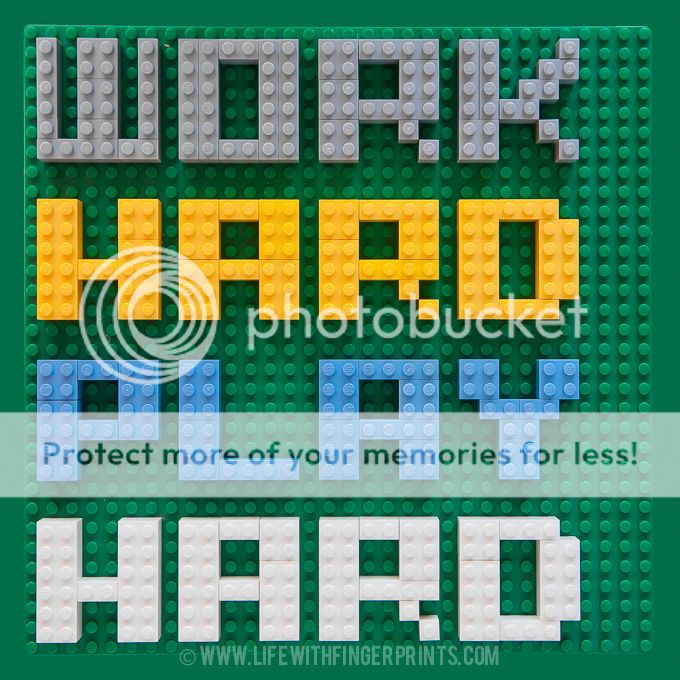
My homemade Christmas gifts come in all shapes and sizes. I had the idea for Hunter's homemade Christmas gift almost 6 months ago. I was working to redo his room and after I got the furniture and bedding placed I knew I wanted a picture hanging between his beds. Almost immediately the thought came to me to take a picture of his legos and hang it on the wall. The idea morphed into Lego wall art - making a quote out of his Legos and printing it for his wall.
I chose a short quote to make sure I could make it fit and look uniform. I spent an afternoon with his legos while he was at school and was done in no time.
I made a 20x20 print and put it in an Ikea Ribba frame.
Christmas morning he opened it and gave me the exact reaction I was looking for. Excitement.
We promptly hung it in his room and it was just as I had envisioned many months ago. "It's awesome mom, I didn't know you could make words out of Legos!" Yes son you can, and it's much easier than the instructions that take 300 steps to build a ship!
Monday, September 21, 2015
Talk like a pirate...
Did you know that once a year Krispy Kreme celebrates "Talk like a pirate day"? Not only do they celebrate it - they give donuts away on this special day. Saturday morning, I started to see my instagram feed flooded with pirate pictures from my friends in the east celebrating pirate day. I had heard of this made up holiday before but I never participated.
I told Steve we could get a dozen free donuts for every person we dressed like a pirate in the family. He didn't hesitate - we gathered supplies and clothes from around the house, pulled a costume out of the Halloween box and pulled the Lego pirate out of the attic. In 20 minutes we were decked out in pirate attire.
When we walked in the Krispy Kreme, we were greeted by other pirates who came to collect their donuts. The employee said Hunter's was by the far the best costume of the day - which he was stoked about. Within 1 minute, we had our donuts and were walking out. No wait, no fuss...for 5 dozen donuts. (I didn't dress up - we were in a hurry and I didn't have the time to gather a costume for myself.)
The kids eyes were wide with excitement watching those boxes of donuts walk out with us - to which we quickly dashed their hopes of eating all of them. We made some deliveries to friends - a dozen here, a dozen there - we had friends over for dinner and had donuts for dessert. By the end of the first day we were left with just one dozen. You can imagine what the kids chose for breakfast the next morning!
It was fun. I'm not sure why they run such a crazy promotion but you better believe I'll be participating next year! I gathered all the pirate gear and put it in a bag - it will be much easier to put together next year's costumes. Thank you Krispy Kreme for the five pounds we all gained this weekend.
Friday, September 11, 2015
Lego Costumes...part 2...
See how I made the Lego heads here.
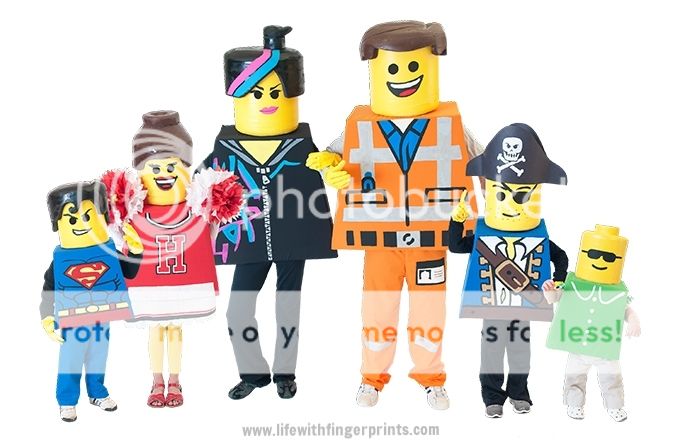
Back to our Halloween costumes...from last year! The Lego costume bodies were made from cardboard, large furniture boxes. I measured a lego mini figure and proportionally made measurements based on everyone's height to create a pattern. They were cut out using my jigsaw (yes, I used a saw for cardboard - it's what I'm comfortable with!) and taped together on the inside and the outside using Gorilla tape. I first tried duct tape but it didn't stick to the cardboard like the Gorilla tape did.
I initially thought I would quick spray paint all the bodies. But a trial run left me with undesirable results. The paint soaked into the cardboard and all you could see was the tape on the edges. Plan B: Cover the cardboard in fabric and paint the design on the fabric. Plan C: skip the bodies all together and wear clothing that represents the bodies. I was determined to make plan B work.
I didn't think covering the boxes in fabric would be extremely difficult. However, I'm not a seamstress and I basically had to create slipcovers for each box with odd angles. The results were a long shot from being perfect but they were 100% better than plan A and still better than plan C.
With fabric covered boxes, I used our video projector showing lego guys to trace designs on the boxes. I then went to work painting each design with craft paint.
This was probably my favorite step out of the whole project. I remember Steve was out of the country the week before Halloween and all I had was cardboard box bodies somewhat put together before he left. As I painted late into each night he was gone, I saw the costumes coming together and it made excited. Each detail I painted added to authenticity and it wasn't the chore I thought it would be. The task was more than rewarding and I watched some great movies in the process.
My mom came into town while Steve was gone and was with me while I painted a few of the bodies. She shook her head in disbelief that I was spending as much time as I was on each body. And although the word "crazy" escaped her lips more than once in describing the process (or perhaps referring to me in general) she pitched in and helped me out. Two of the costumes needed some pants to go with their bodies - and she sat at the sewing machine and whipped them out. Where was she when I was covering the boxes?!
By the time Steve arrived home just in time for Halloween, he was amazed by the finished product. The kids continually tried them on and loved them. The bodies and the heads sat on our dining room table in hopes of not being ruined before the big day and everyone that came to our house and saw them could not wait to see them in action.
Who could've predicted that we would have record heat (breaking 100) on Halloween. Those costumes were not meant for summer weather and our heads were a bit toasty. But the kids were troopers (aside from Cannon who was sick that evening and didn't wear a costume at all!)
Just about everywhere we went - we were celebrities - we took a lot of pictures with random people. It was a fun night.
After Halloween was over they sat back on the dining room table until I could figure out what to do with them. I have high hopes of wearing them again someday - so they carefully sit wrapped in garbage bags in the attic awaiting to make their grand re-entrance!
Back to our Halloween costumes...from last year! The Lego costume bodies were made from cardboard, large furniture boxes. I measured a lego mini figure and proportionally made measurements based on everyone's height to create a pattern. They were cut out using my jigsaw (yes, I used a saw for cardboard - it's what I'm comfortable with!) and taped together on the inside and the outside using Gorilla tape. I first tried duct tape but it didn't stick to the cardboard like the Gorilla tape did.
I initially thought I would quick spray paint all the bodies. But a trial run left me with undesirable results. The paint soaked into the cardboard and all you could see was the tape on the edges. Plan B: Cover the cardboard in fabric and paint the design on the fabric. Plan C: skip the bodies all together and wear clothing that represents the bodies. I was determined to make plan B work.
I didn't think covering the boxes in fabric would be extremely difficult. However, I'm not a seamstress and I basically had to create slipcovers for each box with odd angles. The results were a long shot from being perfect but they were 100% better than plan A and still better than plan C.
With fabric covered boxes, I used our video projector showing lego guys to trace designs on the boxes. I then went to work painting each design with craft paint.
This was probably my favorite step out of the whole project. I remember Steve was out of the country the week before Halloween and all I had was cardboard box bodies somewhat put together before he left. As I painted late into each night he was gone, I saw the costumes coming together and it made excited. Each detail I painted added to authenticity and it wasn't the chore I thought it would be. The task was more than rewarding and I watched some great movies in the process.
My mom came into town while Steve was gone and was with me while I painted a few of the bodies. She shook her head in disbelief that I was spending as much time as I was on each body. And although the word "crazy" escaped her lips more than once in describing the process (or perhaps referring to me in general) she pitched in and helped me out. Two of the costumes needed some pants to go with their bodies - and she sat at the sewing machine and whipped them out. Where was she when I was covering the boxes?!
By the time Steve arrived home just in time for Halloween, he was amazed by the finished product. The kids continually tried them on and loved them. The bodies and the heads sat on our dining room table in hopes of not being ruined before the big day and everyone that came to our house and saw them could not wait to see them in action.
Who could've predicted that we would have record heat (breaking 100) on Halloween. Those costumes were not meant for summer weather and our heads were a bit toasty. But the kids were troopers (aside from Cannon who was sick that evening and didn't wear a costume at all!)
Just about everywhere we went - we were celebrities - we took a lot of pictures with random people. It was a fun night.
After Halloween was over they sat back on the dining room table until I could figure out what to do with them. I have high hopes of wearing them again someday - so they carefully sit wrapped in garbage bags in the attic awaiting to make their grand re-entrance!
Subscribe to:
Posts (Atom)