Showing posts with label Decor. Show all posts

Tuesday, May 17, 2016

Easy DIY Shiplap Wall...

I'm not sure how I missed posting this sooner - considering it's been done for over a year now!

Easy DIY Shiplap Wall
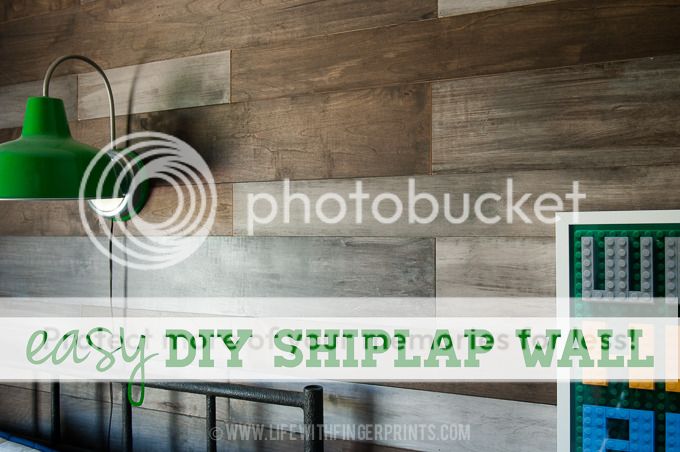
I know I'm not alone in my love for shiplap - thank you Joanna Gaines! And yet it always seemed like a lot of work. Not only that, but I questioned just how long I would love shiplap. And when I get tired of it, I will have to rip it down and repair the wall behind it. Yet, I had a wall in Hunter's room that was screaming, "Cover me in wood!" And I obliged.

I found a pinterest image of a wall in a nursery room that I fell in love with. I loved the variation of the color in wood, I liked the relclaimed look. I found a company locally that sold reclaimed wood and I priced it out - over $2000 to cover one wall. That wasn't in the budget. I went back to my inspiration picture and traced it to a design group website - who just so happen to sell a tutorial to the wall. Part of me knew it couldn't be that difficult and I could definitely figure it out on my own. But part of me wanted to follow a step by step instruction and get it done. I spent the $15 and bought the tutorial. I'm glad I did.

The tutorial walked me through step by step as to what to do. I did deviate from the plans just a bit. It called for pine boards in different widths. I knew finding nice, straight boards would be hard. I bought plywood and had Home Depot rip it down to the different widths that I needed. The most helpful part of the tutorial was being told what custom stains to purchase and the process of creating different colors. Paint white on these boards, stain these boards wipe off after 3 minutes, stain these boards, wipe off after 7 minutes...you get the idea. It gave me the color variation I loved in the reclaimed wood.

Here's how the room started out.
Easy DIY Shiplap Wall

I prepped and stained the boards per the tutorial.
Easy DIY Shiplap Wall
I located the studs on the wall and used a brad nailer to nail the wood directly to the wall. I started at the bottom (I chose a plywood depth that worked with my baseboards) and worked my way up putting a penny in-between for spacing.
Easy DIY Shiplap Wall
It was a weekend warrior project while Steve was out of town and he was pleasantly surprised to find it finished upon his return. It's very masculine - perfect for my boy's room and definitely a look that will grow with him.

Tuesday, March 29, 2016

Easy hat rack...

I found these cool animal head hooks at Home goods over a year ago. I wasn't sure how I would use them but I picked them and put them in Hunter's closet until I figured out a permanent place for them.

They found their permanent place on Hunter's wall just before Briggs was born.

They were different finishes when I purchased them, so I used a glossy Rustoleum spray paint and gave them a couple of coats of paint.
Easy Hat Rack
Easy Hat Rack
I had a scrap pine board in the garage that got a fresh coat of white paint and I mounted the hooks to the board. Hunter was excited to come home from school and find he finally had a place to hang his hats.
Easy Hat Rack
Easy Hat Rack

Tuesday, March 22, 2016

Stay awhile...inexpensive artwork...

I've mentioned before that winter in Arizona is amazing. (It's what gets us through our toasty summers!) And every winter we get a crew of visitors escaping their winter weather. Our door is always open for visitors. We love it. Our kids love it. The minute someone walks out the door our kids are asking who our next visitor is.

This winter we've had an abnormally high number of visitors. When my mom was here, we were naming off all the friends/family we've been able to see. We crunched the numbers and figured since December 27 through my mom leaving on March 15, we had someone in our guest room for 49 out of 79 days. The longest visitor was my brother who was here for a week with his family right after Christmas and three additional weeks (although not consecutively) for work. When we say we love visitors, we really do mean it.

I even changed out some artwork in the guest room to reflect our love for visitors.

Inexpensive artwork for guest room using Staples engineer prints

Looking for inexpensive artwork?

Grab a 24x36 frame from Hobby Lobby.

Print out a saying at Staples as an engineer print. (There's plenty of Etsy shops that sell digital files to quotes and sayings if you don't want to design one yourself.) The print will cost you less than $4 for black and white.

It's cheap enough that when we grow tired of visitors we can change the saying!

Thursday, February 4, 2016

Valentine's Printable Banner...

Here's a Valentine's craft I shared over at HowDoesShe.com.

After the Christmas decor comes down and I've finished sweeping the red and green glitter - I like to get my house back in order. It always feels like Valentine's sneaks up on me and it seems I'm never quite ready to deck the house out again in holiday decor. Don't get me wrong - I love to decorate for the holidays, but some holidays I'm go for simple and Valentine's is one of them.

This year I made a Valentine's rag banner and had the kids make their own decoration with a printable banner I designed for them.
Valentine's Printable Banner for Kids
For full instructions and the free printable download, go to howdoesshe.com.

Tuesday, January 19, 2016

Valentine's Rag Banner...

Valentine's Rag Banner
It's time to start dressing the house in red and pink! A while back, I showed a rag banner I made for Hallie's birthday party in navy and gold. It was surprisingly easy and cheap enough that I've made it again for Valentine's day.

Here's how to make it:
1. Buy 1/4 yard of four different fabrics.
2. Cut 9 one inch strips of fabric. (I folded it and used a rotary cutter to make the process quick)
Valentine's Rag Banner
3. Take each one inch strip (which is the width of the fabric you purchased) and cut them into fourths. I take all the strips of one color and hold them in my hand - fold it over and cut and take each half and cut it again. This will give 36 strips of each fabric.
Valentine's Rag Banner
4. Choose what material you want to tie the fabric to. It could be ribbon, baker's twine, string, etc. Fold a piece of fabric in half with the twine sitting on top of it. Take the ends and put them through the loop and this will create a knot.
Valentine's Rag Banner
5. Continue alternating fabrics, tying knots, pushing the fabrics together until you have the fullness and length you desire.
Valentine's Rag Banner
It really is that easy. This is a sit-on-the-couch-and-watch-a-movie project which is just what I need sometimes!

Thursday, January 7, 2016

Homemade Christmas gift...Lego Wall Art...

My homemade Christmas gifts come in all shapes and sizes. I had the idea for Hunter's homemade Christmas gift almost 6 months ago. I was working to redo his room and after I got the furniture and bedding placed I knew I wanted a picture hanging between his beds. Almost immediately the thought came to me to take a picture of his legos and hang it on the wall. The idea morphed into Lego wall art - making a quote out of his Legos and printing it for his wall.

I chose a short quote to make sure I could make it fit and look uniform. I spent an afternoon with his legos while he was at school and was done in no time.
Homemade Christmas Gift; Lego Wall Art

I made a 20x20 print and put it in an Ikea Ribba frame.

Christmas morning he opened it and gave me the exact reaction I was looking for. Excitement.
 Homemade Christmas Gift; Lego Wall Art

We promptly hung it in his room and it was just as I had envisioned many months ago. "It's awesome mom, I didn't know you could make words out of Legos!" Yes son you can, and it's much easier than the instructions that take 300 steps to build a ship!
 Homemade Christmas Gift; Lego Wall Art

Thursday, December 17, 2015

Christmas craft week...

I'm wishing this time of year I could make more time for some holiday crafting - instead I'm working on a front yard makeover so all crafting is put on hold! So here's a round-up of some ideas from my Christmas craft week last year that I enjoyed pulling out and decorating with this year:

Life with Fingerprints: DIY Holiday Star, Christmas Craft

Life with Fingerprints: Christmas Craft, holiday forest out of 2x6 wood


Life with Fingerprints: Cheap and easy Christmas craft using paper straws and an Ikea frame

Life with Fingerprints: Christmas Craft, pillows made from store bought napkins


Tuesday, November 24, 2015

"All that glitters" party...

Hallie was up for a birthday party this year and she was ready. Her birthday fell right before Halloween and my mom's visit so we pushed it off just a little bit. As we talked about different ideas for her party I quickly realized she's still young and she's our only girl so it only made sense to make everything glitter.

Glitter Birthday Party


We made glitter playdough that we used to play sculpterades (from the game Cranium) as teams - and then the girls just enjoyed playing with it.
Glitter Birthday Party

They decorated sparkly cookies.

And sparkly letters! I bought a paper mache letter for every girl at Hobby Lobby that they were able to decorate with glitter, sparkles, washi tape and other decorations. There was glitter everywhere!
Glitter Birthday Party

In the end, they spent time giving each other manicures with nothing less than...glitter polish.

Glitter Birthday Party

And they went home with little goodie bags that sparkled. Plain white bags from Joanns that I made polka dot with glue and added glitter.
Glitter Birthday Party

They sparkled from their heads to their toes by the time they were finished. I'm just glad that the party was outside because even then - I'm still finding glitter throughout the house!

Navy Tablecloths - Amazon
Table runner - Target holiday line
Plates and Napkins - Target
Scrap garland - made from 1" fabric strips from Joanns
Drinking jars - dollar section Target (tied with glitter tulle)
Paper Mache Letters - Hobby Lobby
Glitter Playdough - made from this website

Thursday, November 19, 2015

Wooden "Give Thanks" banner...

Several years ago I made a "Be Grateful" banner out of wood. I loved it so much but there was one small problem - I made it out of pine and that thing was heavy. It tore many Command strips off the wall! This year I reprised the project and made it out of thin underlayment - plywood.

I had Home Depot cut the plywood into strips and I used the miter saw to cut the triangles. Working with plywood like this can be a bit tricky and it leaves plenty of splinters. One side has a much nicer finish after the cutting process - I stained that side.
Wooden
Wooden
Wooden

The other side, which wasn't so nice, got a couple coats of chalkboard paint.
Wooden
I debated how I should put the letters on: hand paint, vinyl letters, burning with a hand tool or a foam stamp. I went the easy route and what was readily available to me. I then carefully painted the edges with a metallic gold paint.
Wooden
Wooden
It hangs on the entertainment center with two small command strips and so far the weight hasn't been a problem. Not only that but the wood tones look much better than the painted white "be grateful" banner I previously did.
Wooden
Wooden
You can see more details and a full tutorial at HowDoesShe.com.
Related Posts Plugin for WordPress, Blogger...