
This measurement drove the design. I cut plywood to size and glued 1x6 planks of MDF on top of it.
 To frame out the top portion I glued and nailed 1x3 pieces of pine.
  To frame out the entire door to hide all unfinished edges, I glued and nailed 1x2 pine to the outer edges.
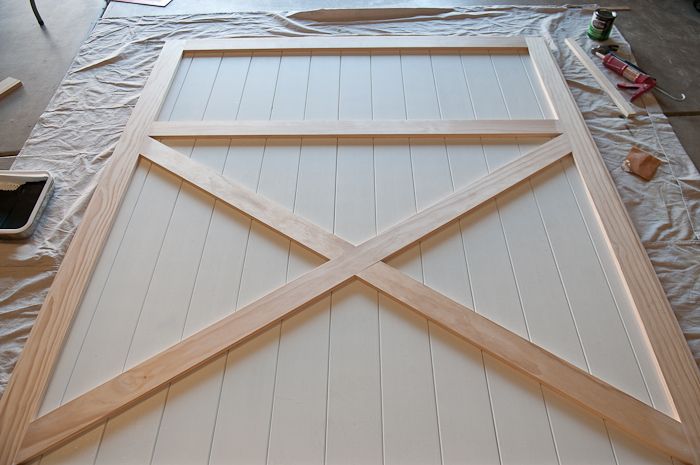
We built the door in no time just hours before my dad flew home. I thought, "I'll paint this thing tomorrow and have it hanging by the weekend." I should know better than to make such far reaching claims. It took some time just trying to figure out what color to paint it. It's big and takes up a lot of wall space. I color matched the blue/gray from our curtains and after priming, I painted two coats. I was feeling pretty good about the whole thing. Until my husband walks by and says, "That's not the final color is it?" He claims he was just wondering because he was unsure - but of course if someone says that you start to question. For days I walked by the door in the garage wondering if I should repaint it. I finally painted a scrap piece and set it against the wall in the entryway to get an idea of what the door would look like.
It didn't take long before I was back at Home Depot buying more paint. But painting it was so tedious that I thought I would spray paint it this time. I had painted some benches a while back and they turned out great, so I bought the same color and started painting.
 Coat after coat after coat I sprayed the door. After 9 cans of paint - I loved the color and coverage, but the sheen was splotchy and I was devastated. No matter what I did I couldn't get it even. I researched on-line with no luck. I tried a wipe-on polyurethane in one section just to see if I could get an even sheen - no luck. I was deflated. I hate when I waste time and resources working on a project!
 I knew I had to paint the whole thing again with a brush. But of course spray paint is oil-based and I was using latex paint, so I sanded the door for hours. I didn't take all the paint off but I made sure the old paint was good and rough. I meticulously cleaned the door and painted by brush (color matched to the spray paint) the door with two more coats. The door might very well be 10 lbs heavier just with the addition of paint alone!
After attaching the hardware, we were ready to hang it last night and with some help from family (it's a very, very heavy door) we managed to get it on the wall - and I sang praises when that heavy door didn't rip the hardware right off the wall! I was a little concerned. Maybe more than a little.
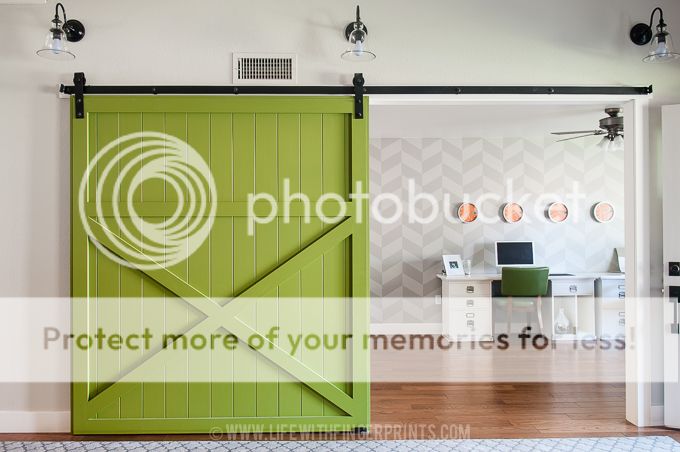
 Thank heavens this is done. Building it was a breeze (which is usually how my projects go) but the finishing detail (paint/stain) always takes longer than I anticipate and its not the part I enjoy. Steve and I are both excited to reclaim the garage that has been overtaken by the project for over a month now!
 It's done and I love it and I'm so happy I went with the punch of color as opposed to the neutral blue/gray. More importantly, I'm free to start something else!
Hi Kara,
ReplyDeleteWe don't know each other, but I went to school with your husband.
I just wanted to say, I love all the projects you are doing they keep me inspired!
I hope that you have a wonderful day!
Adele Heslington
You're right, we don't know each other - but I love your boards on pinterest so that pretty much makes us good friends!!
DeleteI agree! Its amazing how you can feel like you know someone just by their pinterest boards! Some day we must meet, we probably would be good friends!!!
DeleteSo fabulous--and so straightforward! What does it look like from the inside with the door closed? Are you OK with a giant green piece of plywood? hahaha Would there be room with the hardware to put the additional 1x3s on the other side, too?
ReplyDeleteI totally forgot to mention the back of the door! The back of the door is just sanded plywood, but I painted it with black chalkboard paint. So when the door is shut, I have a chalkboard in my office (I think I'm going to chalk some cool quotes on the back side of the door and occasionally use it as a photo backdrop. I couldn't put 1x3s on the back side of the door because then it would've made the door too deep. I know you can custom order from the same company to fit whatever door depth you desire, but I went with one of their two standard sizes to get my hardware faster. It really is an easy project if you paint it right the first time!
DeleteThis is absolutely amazing. I wish I could come pick your brain, or just follow you around observing your projects (all the while taking notes!) I don't know you either, but am utterly impressed with the projects you've accomplished while kiddos at your feet! It took me 3 weeks to paint a darn dresser with my 2 year old toddling around. 3 weeks! :)
ReplyDeleteonce again...you blow my mind. i'm glad we share a name. i wish we shared talents!
ReplyDeleteLooks amazing!
ReplyDeleteWow! It's awesome!!
ReplyDeletethis is so fun!!i'm actually laughing that steve would comment about the soft blue color being the color of choice and not the loud green color! ha, i totally love it! it looks amazing! . .might be in az next month, if so i'm bringing brady by to see all your hard work . .and to say hello of course! should i bring my sewing machine :)
ReplyDeleteVery unique. And very classy. Great final color. Thanks for the rundown. When you're in the office with door closed, how well does it block out the noise from the rest of the house? Thanks again, and congrats on a nice project.
ReplyDeleteAll the wood floors seem to make the house echo, but it blocks out sound pretty well.
DeleteKara it is amazing just like I thought it would be. I'm trying to figure out where I can put one in my house! You have got some serious talent. Thanks for sharing!
ReplyDeleteI love, love, love this! So creative, so amazing. I can't believe how much time you invested painting it, how frustrating, but it was worth it. That is one of my favorite colors of green.
ReplyDeleteLovely! I love the idea of chalkboard on the back.
ReplyDeleteI love this!! We are going to try to do this in our youth room- my husband is the youth pastor. Where did you find your hardware at?
ReplyDeleteThank you! Allyson
I bought the hardware from rusticahardware.com - it's pricey but it's one of the few places that had a style I liked. Good Luck!
DeleteOh my gosh. You did this. You actually did it. I've had this pinned on one of my boards. This is exciting to see someone actually do this project. I'm impressed. Maybe one day when I have an actual home, I will get to do a project like this. P.S. I haven't looked at your blog (or really any blogs) in a really really really long time. :)
ReplyDeleteThe finish looks great! I thought for sure you had sprayed it because it looks so flawless! All your hard work was worth it!!
ReplyDeleteI was more than impressed with the paint (Regal by Benjamin Moore) that I used and how smooth the finish was.
DeleteLooks Great! Did you use the sheet of plywood out of necessity or to make the chalk board? Wondering if it was 100% necessary to use the plywood. Considering making one for our home, but wanted to ask this first as it is important for both sides to have the same look and feel.
ReplyDeleteThe plywood was necessary in our case - the chalkboard was an added bonus. I pieced together several 1x6 boards and in order to get a nice finished look on the back it needed the plywood (we were working with MDF) plus it made for a secure way to piece it all together. It wouldn't be necessary if you used real wood planks and were going for more of a rustic look. Good Luck!
DeleteFantastic! And I love the final color. Would you mind sharing the name of the color? I'd love to do some kitchen accessories in the same shade. So bright, juicy, rich!
ReplyDeleteThe final color is a Benjamin Moore color match to a Rustoleum spray paint called EDEN. It really is as juicy as it looks, I love it!
DeleteI've been putting off a sliding barn door project for months and your post inspired me to get to work! I've never worked with MDF before. How many planks did you need? How much do they cost? Are they easy to paint/cut? Why did you choose those over pine planks? What was the cost for building the door alone (no hardware or paint)? Sorry for a million questions. Thanks!
ReplyDeleteI used 13 planks (1x6 mdf with eased edges) for our 6 foot door. They are just as easy to cut as any piece of wood, I went with MDF because every board is straight and there's no knots. Buying wood can be painful when you're looking for perfectly straight boards and I wasn't going for a rustic look. I also liked that the MDF had an eased edge so when I planked them right next to each other it looked nice. The wood alone was around $250. It's backed with plywood and trimmed with pine (pine select which is considerably more). There's no doubt you can make it for cheaper - the hardware is what cost a lot of money, but I've seen a lot of DIY hardware that look great as well. It's easier than it looks - good luck!
DeleteThank you for answering all of my questions! This helps a lot. I love the uniformity and smoothness of your door. Time for me to get to it!
DeleteThis comment has been removed by the author.
ReplyDeleteYour door is amazing! Would you be willing to explain the backside in a little more detail? Two pieces of plywood? How did you handle a seam (assuming you used two pieces of plywood)
ReplyDeleteIt is two pieces of plywood. There is a horizontal seam through the middle of the door - just make sure the boards are flush. Once everything was put together, I used putty to fill the seam and then sanded it down before painting the back with chalkboard paint. Good luck!
DeleteThank you very much!
DeleteWhat is the thickness of the plywood?
ReplyDeleteIt was 1/2 thick - I had purchased my hardware before building the door and the hardware was for a specific depth of door. I designed the door and attached it to the size of plywood that would give me the right depth measurement. Thanks
DeleteHi Kara, New follower!!! Planning on a similar door for my office/studio and then read all the comments about how you used the chalk for a background wall. GREAT idea! One question about the hardware. Did you have to order something for the floor to keep the door from swinging out? I was visiting a friend who has a door and my 2 year old instantly went to push it out. I was planning on ordering the ASPEN hardware from www.nwartisanhardware.com but need to look into that...
ReplyDeleteWelcome! I purchased my hardware from rusticahardware.com and included in my hardware kit was a floor guide. It gave the option of having a floor mounted guide, or a wall mounted guide. I chose the wall mounted because I didn't want to drill something into my hardwood floors! Walls are easier to repair! It doesn't sway at all from the wall. Hope this helps!
DeleteHi Kara! Thank you for the inspiration, my husband and I just followed your tutorial to build a similar barn door in out home! You weren't kidding when you said it's heavy lol. I was wondering if you have had any trouble with the weight or if it's held up fine over the years. I'm not sure how much mine weighs but thinking about weighing it to see if it's more than my hardware's max load of 198 lbs. Thanks so much!
ReplyDeleteWe haven't had a single problem with ours, but I think our hardware was rated for 500 lbs. We did make sure it was installed into the header above our door though.
DeleteWhen zooming in on your pictures the finished project looks like the exterior edges of the door are beveled or that you set the pine frame in 1/2 inch from the edge. Although in the cross cut picture of the door under construction I don't see that detail. You also don't mention the detail in your article. Can you clarify if the door is beveled in some way on all 4 sides? Also how and why you did that?
ReplyDelete