
Hunter's room is a work in progress and it's been in progress since...we moved in. Even after painting and decorating it (with stuff from his old bedroom) I just never loved it. But rearranging his room, planking the wall and hanging these lights are making me love his room.
Lighting makes a space and it always seems to be the budget breaker as well. I had my heart set on some beautiful, kelly green barn lights from an online store. They were also ridiculously overpriced at $340 a piece. I was determined to get the look for less.
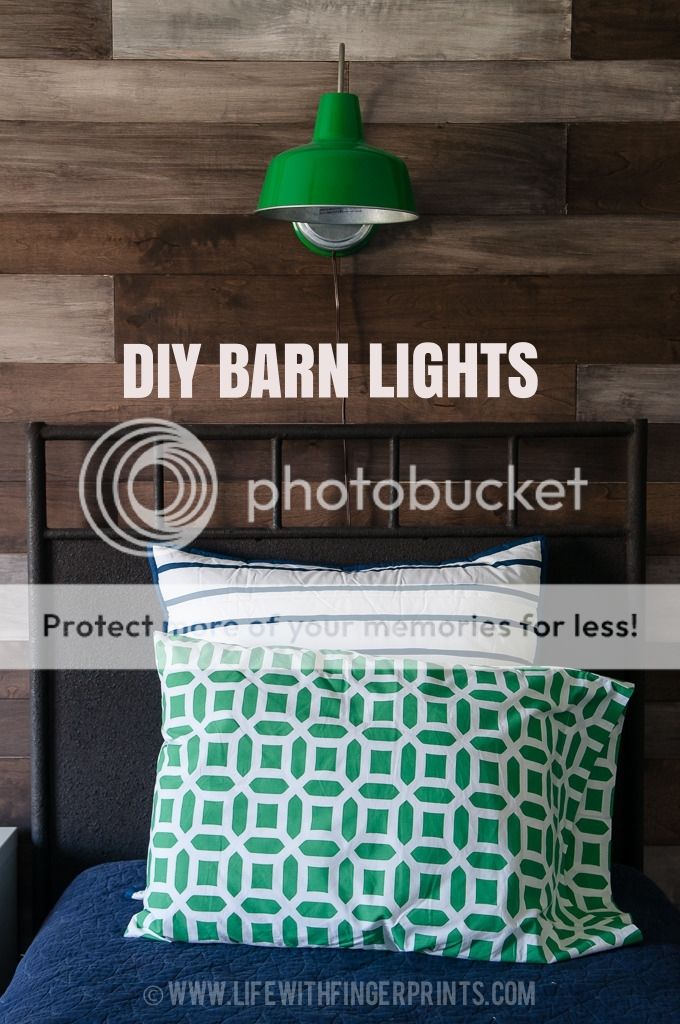
Here’s how I did it. I found some outdoor lights at Lowes for $40 a piece. The lights were meant to be hard-wired – but I didn’t want permanent wires ran to these lights. So I opted to convert them to plug-in lights after talking with an electrician. Before painting, I drilled a hole in the bottom of the lights using a metal drill bit.


I could’ve painted the entire light green, but I wanted to preserve some of the aluminum color. I used painters tape to mask off the areas I didn’t want painted and sprayed it with Rustoleum glossy paint.


With the paint dry – I converted it to a plug-in light. I purchased a wire kit and connected it to the hard-wired wires found in the light.


I used the bracket that came with the light and modified it slightly so it would hang on my wall and in no time I had two lights hanging above his two beds in the room.


They were just what I was hoping for and they didn’t break the bank. No need to pay for high-end, create your own cheap custom barn lights!
You are so creative!
ReplyDeleteThanks!
DeleteHow where you able to plank the wall? I have been wanting to do that to My son's room but kind of hesitant because I haven't found a good way of installing the planks.
ReplyDeleteThe planks are plywood and I toenailed them into the wall with my finish nailer. I'll be doing a full tutorial on the wall shortly. Thanks
DeleteI LOVE this light! That green color is so perfect.
ReplyDeleteLove these! I need one in my craft space!!
ReplyDeleteSeriously - I keep thinking of new colors and places where I can put them!
DeleteLove the fresh green pop against the wood wall - so pretty!
ReplyDeleteLove this! Can you share how you modified the bracket?
ReplyDeleteOn a typical mounting bracket, there's a large threaded post where most of the post screws into the electrical box. Because this was mounted flush against the wall, I had to cut off the post with my dremel tool to a quarter of the size so a small portion screws into the bracket and the other portion sticks out from the light fixture and the decorative nut is screwed on top. Hard to explain, hope that helps!
Deletewhat type of paint did you use?
ReplyDeletewhat type of paint did you use?
ReplyDeleteI used a glossy Rustoleum (paint and primer in one) from Home depot.
Delete