Showing posts with label Crafts. Show all posts

Thursday, November 19, 2015

Wooden "Give Thanks" banner...

Several years ago I made a "Be Grateful" banner out of wood. I loved it so much but there was one small problem - I made it out of pine and that thing was heavy. It tore many Command strips off the wall! This year I reprised the project and made it out of thin underlayment - plywood.

I had Home Depot cut the plywood into strips and I used the miter saw to cut the triangles. Working with plywood like this can be a bit tricky and it leaves plenty of splinters. One side has a much nicer finish after the cutting process - I stained that side.
Wooden
Wooden
Wooden

The other side, which wasn't so nice, got a couple coats of chalkboard paint.
Wooden
I debated how I should put the letters on: hand paint, vinyl letters, burning with a hand tool or a foam stamp. I went the easy route and what was readily available to me. I then carefully painted the edges with a metallic gold paint.
Wooden
Wooden
It hangs on the entertainment center with two small command strips and so far the weight hasn't been a problem. Not only that but the wood tones look much better than the painted white "be grateful" banner I previously did.
Wooden
Wooden
You can see more details and a full tutorial at HowDoesShe.com.

Thursday, September 17, 2015

Ikea Art Cart...

Our playroom was once littered with art supplies. I love that my kids like to create but finding broken crayons and glue without tops was driving me crazy. Every couple days, I would have the kids round up all the supplies and put them back in their place in the playroom. Just hours after cleaning, I would walk in and find art supplies everywhere. I realized it wasn't really the older kids who were creating the mess - its the monster one year old we have running around that seems to make messes wherever goes. The only way to solve the problem was to remove the art supplies but make them very accessible.

Introducing the Ikea art cart that resides in my office closet.
Ikea Art Cart for craft supplies

I purchased a cart on wheels from Ikea. This allows the cart to be mobile and can travel to and from the playroom when needed.

Also from Ikea I purchased two sets of white magazine holders. These hold the coloring books, workbooks and clipboards. The clipboards were purchased for another project that I never completed and the kids kept sneaking them to color on. They are a staple on the art cart.
Ikea Art Cart for craft supplies

The bottom two layers are filled with quart-sized canning jars. Hallie meticulously sorted out all the supplies and organized them into different jars. Crayons, colored pencils, twistable pencils, twistable crayons, pencils and pens, scissors, markers, glue sticks, glue, whiteboard markers...and more. Everything they need for a art project or school assignment. Sometimes, they don't need the whole cart and they leave it in the closet and take the jars they need. Hallie will take a jar to her room to color and return it later.
Ikea Art Cart for craft supplies
It's been over 6 months and the supplies have remained relatively organized. There have been a few casualties including when the cart was left in the playroom by accident and a certain toddler dumped out the jars. But the kids have been great about making sure it gets put away since then.
Ikea Art Cart for craft supplies
The best part is anytime they're looking for a supply - they know exactly where to look. It's also easy to see what we're running low on - which doesn't happen to be gluesticks, we've got two jars full!

Friday, August 21, 2015

DIY Marker Board...

Life with Fingerprints: DIY Marker board using a frame and wrapping paper
I've got more than a couple of these marker boards around the house and I love them. I have them in the hallway, the kitchen, the office. They're easy and cheap and they bring in whatever pop of color or pattern I'm looking for.

Start with a frame - I like the simplicity and affordability of the Ikea frames.
Life with Fingerprints: DIY Marker board using a frame and wrapping paper

Remove the mat from the frame and cover it with paper. I find that wrapping paper works great. I've had great luck with TJ Maxx and Home Goods wrapping paper - great colors and modern patterns.
Life with Fingerprints: DIY Marker board using a frame and wrapping paper

Tape the paper in place around the mat and replace the mat in the frame.
Life with Fingerprints: DIY Marker board using a frame and wrapping paper
Hang them on the wall, lean them on a shelf, stand them on a counter - you've got a marker board. Regular dry erase markers write on the glass and wipe off without any problem.

We use the ones in the hallway to hold quotes, reminders and lists.
Life with Fingerprints: DIY Marker board using a frame and wrapping paper
The one in the kitchen was used to write love messages between family members.
Life with Fingerprints: DIY Marker board using a frame and wrapping paper
The ones in my office I don't usually write on - I just like the color they bring to the room, but occasionally I'll write a quote on them.
Life with Fingerprints: DIY Marker board using a frame and wrapping paper

When you want to switch things up - find a new wrapping paper and the look is updated in no time.

Thursday, July 2, 2015

Coffee Filter Garland tips and tricks...

My friend made a beautiful coffee filter garland for her daughter's birthday party. I loved everything about it and when I decided to throw a baby shower for my niece I gave it a shot. It was just as cheap and easy as I was hoping for.
Life with Fingerprints: Coffee Filter Garland tips and tricks, Grand Adventure Baby Shower
You can find hundreds of instructions searching pinterest - they're all pretty much the same. Here's just a few tricks I learned in the process.

First off - I used 1000 filters (although not all of them ended up being strung, I ran out of time!) I used the larger filters that are for 12-16 cup coffee makers.

Many instructions tell you to put color water in spray bottles and spray the filters. This would've taken forever to dye 1000 filters. After dying 25 filters with a water bottle I became more efficient.
Life with Fingerprints: Coffee Filter Garland tips and tricks, Grand Adventure Baby Shower
I mixed water and dye in a medium sized bowl. I then separated the filters out into groups of 50 (my filters came divided at 50 filters). I took the entire stack and dipped them in the bowl.
Each bowl of water covered 100 filters and then I would mix another bowl of water and dye. Each bowl had different ratios which gave a great color variance.

Some stacks I would dip just one side and let the color bleed to the other. Some stacks I only dipped the outside edges. Others stacks I saturated the whole stack.
Life with Fingerprints: Coffee Filter Garland tips and tricks, Grand Adventure Baby Shower
I then separated that stack into smaller stacks and layed them across my backyard to dry.

Life with Fingerprints: Coffee Filter Garland tips and tricks, Grand Adventure Baby Shower
They took a warm Arizona afternoon to dry and once they were dry I threw them in a large garbage sack.
Life with Fingerprints: Coffee Filter Garland tips and tricks, Grand Adventure Baby Shower

Then it was time to string them. 1000 filters could make one 8 foot garland with really dense filters. I needed more than 8 feet so I spaced my filters using clear drinking straws cut into 1/2" sections.

Using fishing line and a sewing needle I strung 2 filters and then a 1/2" straw section, 2 filters, straw section...repeat.

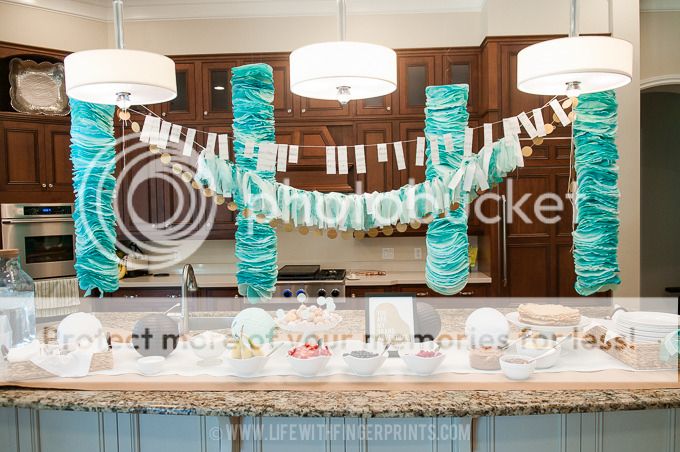
The finished product was several 6 foot garlands that I hung from the ceiling using command strips.

They were the main focal point of the shower. The wow-factor. And they were so darling I couldn't bring myself to get rid of them. So...they're now sitting in my attic just waiting for someone else to have a baby boy so I can throw a party!

Thursday, June 18, 2015

Easy Pennant Banner...

Here's my latest post at HowDoesShe.com - it's not too late to make some 4th of July decorations!
Easy Pennant Banner made with oilcloth fabric and bias tape
One of the easiest decorations that is in my holiday arsenal is the pennant banner. I use them for holidays, birthday parties, wedding and baby showers and more – I’ve got a lot sitting in my closet. And I think I’ve used just about every material to make them: Wood, paper and fabric. Wood is heavy and hard to hang. Paper is the easiest – but buying cute scrapbooking paper isn’t always cheap. Fabric is my favorite because of the durability – but its also the most time consuming because you have to finish edges (unless you’re going with burlap and frayed edges is expected.)

But here’s my secret weapon- use oilcloth fabric and you don’t have to finish the edges and they don’t fray. You get the best of both worlds. Here’s a decoration you can hammer out in 20 mins.

Buy some festive oilcloth – think washable tablecloth material. I’ve seen some fabric stores with great selection but it’s hit or miss. I usually buy oil-cloth online – even then selection is not near what it is for fabric.

Easy Pennant Banner made with oilcloth fabric and bias tape
Easy Pennant Banner Tutorial
Cut strips of fabric (mine were 6″) and then cut out the shapes of your choice. Triangles are always a safe route. Squares are fun. Sometimes I mix it up like I did for this patriotic banner and mix shapes.
Easy Pennant Banner made with oilcloth fabric and bias tape
The next secret weapon to make this project a breeze: extra wide double fold bias tape. It’s double fold which means all the edges are finished.
Easy Pennant Banner made with oilcloth fabric and bias tape
I like to lay the tape out and line them all up so I can adjust what needs to be adjusted. Then slip your fabric in the tape and sew from one edge of the tape to the other. I’ve done enough of these that I usually pin the first flag and eyeball the rest.
Easy Pennant Banner made with oilcloth fabric and bias tape
You’re done. I wasn’t kidding about this being a 20 min project. 15 minutes of cutting. 5 minutes of sewing. It took me longer to get a step stool and hang it than it did to make it.
Easy Pennant Banner made with oilcloth fabric and bias tape
Easy Pennant Banner TutorialI had some scraps and made a miniature pennant for our chalkboard. I didn’t have extra bias tape so I ran the sewing machine from one piece of fabric to the other with a half inch gap and it worked great.
Easy Pennant Banner made with oilcloth fabric and bias tape
Happy decorating!

Thursday, June 4, 2015

"Grand Adventure" Baby Shower...

The first great-grandchild is on its way to the Pothier family. When I heard the exciting news I quickly claimed - if Kathryn, the mama-to-be, can make her way to Phoenix (they live in Wisconsin) I will throw her a family baby shower. (I'm always up for a fun party!) She loves us enough that she came for a visit!

This woman has to be one of the most talented pianists you'll come across and it only seemed appropriate to throw a "Grand Adventure" baby shower with a delicious crepe bar.
Life with Fingerprints: Grand Adventure Baby Boy Shower; crepe bar, fabric bunting, coffee filter garland
A fabric banner with two simple banners - piano music and gold circles.
Life with Fingerprints: Grand Adventure Baby Boy Shower; crepe bar, fabric bunting, coffee filter garland
I tried my hand at coffee filter garlands for the first time and I'm in love. Simple. Cheap. Big impact.
Life with Fingerprints: Grand Adventure Baby Boy Shower; crepe bar, fabric bunting, coffee filter garland
Baby boy already has a name - he is going to be a 5th generation Robert, or Bobby. Kathryn's mother had a picture of her when she was just a little girl holding her little baby doll and on the back of the picture, dated "1990", it read, "Singing to Baby Bobby". Way back when, Kathryn had a baby Bobby in her arms and she'll have one in her arms again shortly. We displayed the picture on the TV.
Life with Fingerprints: Grand Adventure Baby Boy Shower; crepe bar, fabric bunting, coffee filter garland
I'm not typically a shower game kind of person, but we had all the girl cousins there and I knew games would be fun for them so we played two little games. The first - we examined a tray of baby items and they tried memorizing everything on the tray.
Life with Fingerprints: Grand Adventure Baby Boy Shower; crepe bar, fabric bunting, coffee filter garland
The second game - we divided into two teams and we went back and forth singing songs with the word "baby" in it. Even the young girls contributed songs and it was fun to listen to the performances!
Life with Fingerprints: Grand Adventure Baby Boy Shower; crepe bar, fabric bunting, coffee filter garland
What's hard is knowing she's going to have that baby in Wisconsin and we're all going to have to wait to hold him!
Related Posts Plugin for WordPress, Blogger...