
 At the beginning of the year, I decided it was finally time to fill our empty dining room with a homemade table. I knew I wouldn't have the strength to handle it on my own and I knew Steve wouldn't have the time to help me. This is where I volunteered my dad's services. Yes he lives in Idaho, and no he wasn't going to come to Arizona to help me. I came up with the brilliant idea to work on the project this summer while I was visiting my parents. My dad was skeptical and started asking logical questions like, "how are you going to get it home?"
 I'm a dreamer and questions like that don't often deter me from a project - I'd figure it out eventually. I started the project while in Idaho this summer with my dad by my side. We used this plan from Ana-white.com. At one point I thought I would be following the plans exactly. But I wanted my table longer...and then I decided I wanted mine wider, I wanted the tabletop to extend more past the legs, I wanted my top to be thicker, I wanted my legs to be chunkier, and before long my table was only loosely based on the plan.
I purchased hard maple from a store out of Boise (each piece varied in width) and we had it planed to the same thickness. While at the wood store, I determined a table wasn't going to be enough, I also needed a matching bench while I was at it.
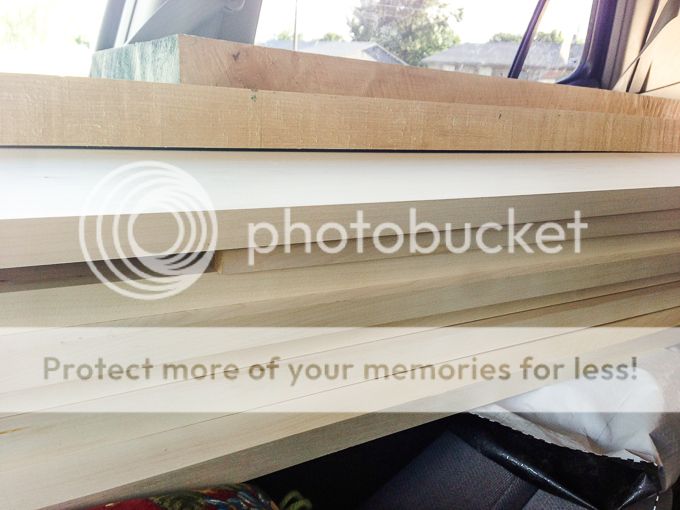 Once we got the wood home, we went through the painstaking process of figuring out what pieces of wood to use for what parts of the table. We had to rip several pieces of wood to make all the measurements work out properly.
  We started by laying out the tabletop. Like I said before, every piece differed in width so I layed out the tabletop so the widths varied from one piece to the next. After some serious research online, we determined that we would glue the planks together instead of using pocket screws. We glued three planks at a time - let it dry for several hours, glued three more planks...dry...glue...you get the picture. We used 2x4s clamped on top of the planks as well as below to ensure that the boards stayed level while gluing. We also used clamps to hold the boards tightly together - this process took a lot of clamps!


 We used enough glue that when clamped it spilled out just a bit. This was easy to scrape off once it dried.
  After the tabletop was glued together, we squared it up and attached a 4 inch breadboard using pocket screws. We then sanded the whole surface using a belt sander with two different belts and then an orbital sander with two different grit sanding discs.
  The legs were put together using large 4 1/2 lag bolts - these bolts were later covered with a decorative piece of wood.
Using the same exact method as the table, we created a matching bench.
By this point in the game - my dad is even more skeptical about me getting the table home as I described how I was going to try and attach it to the top of my car. I would keep the legs unattached from the top and create a wooden frame around the table to protect it from any damage - easy peasy right?? I didn't account for just how heavy a solid wood table would be! Making sure it was protected and safe was a project in itself. Actually getting it on top of my car securely was another battle!
 I set out on my 17 hour journey with a table strapped to the top of my car - Within the first 45 minutes, I made three stops to adjust, readjust and then stop to purchase more straps to secure it a little better. Luckily - the extra straps was just what it needed to not need to stop again.
 Once I got the table home, I proceeded to condition and stain the wood. I did this in our garage in the peak of our Arizona summer. It was hot. Painfully hot.
 I wanted the table to be really dark which took a lot of coats of Minwax Espresso stain. I finally moved the project inside to finish it up because I couldn't handle the heat anymore.
 With more and more stain, I finally got it dark enough. I then used wipe-on poly to seal and protect the surface (I lost count of how many coats but I know it was at least 15! I think it's going to be protected!)
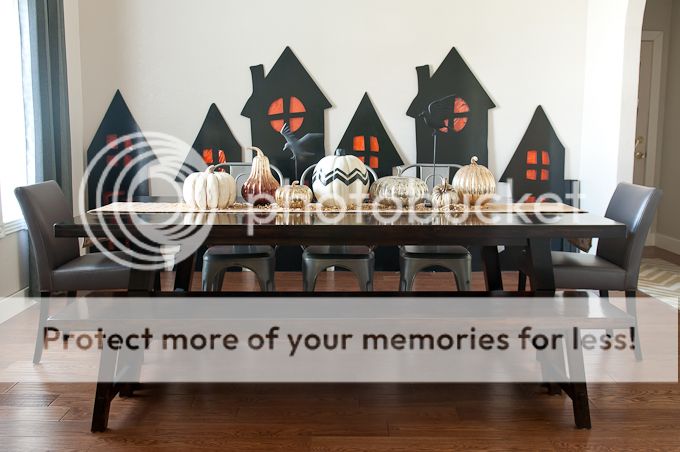
 I then had the pleasure of standing back to admire my (and my father's) work. It was awesome to not only see the dining room with furniture but to know that I built it. By the time I completed it, it had been a 3 month project - a pregnant belly grows a lot in three months and by the time I was finishing it, I had a hard time leaning to the middle of the table without my belly getting in the way!


 I love it. I love the color. I love the bench, the chairs. I love that I have another area to display holiday decorations and I love that we have additional seating for family meals. I love it. I love that my dad was willing to help me out and offer up his talents. I love that I've completed yet another building project. What should I work on next?!
It is beautiful. Love the variety of chairs - very unique!
ReplyDeleteAre you insane? Or just that good? Trying to decide . . .
ReplyDeleteWow. It's gorgeous. And your final chair picks are great.
Amazing. Really beautiful piece of furniture.
ReplyDeleteIt is gorgeous! I'm tempted to show it to my husband and see if he could make something similar. We are in need of a new kitchen table. Beautiful work.
ReplyDeleteIt's easier than it appears. If you follow the plans you can't go wrong! Good Luck
DeleteWow! I want an old farmhouse table and mis-matched chairs. I've been collecting chairs at thrift/antique shops. I need to hunt for a table or make one (yikes!). Yours is beautiful. Good job!
ReplyDeleteHow do you find the time to post such interesting blog posts with such great pix with little kids and a newborn. I am in awe. Your family is so cute, I love reading about them (found you on Shawni's blog). Then I see this table. OMG. You are my hero! Or Wonder Woman!!
ReplyDeleteLuckily the newborn sleeps a lot and my mom is still visiting to help out! There is no wonder woman here - only a very determined woman (even if it takes me months to finish a project!) Thanks for stopping by!
DeleteYou are amazing!! The table is beautiful and I love the wood color too.
ReplyDeleteI love the table and whole dining room set up. You are simply amazing!
ReplyDeleteThanks - it's still a little empty once the Halloween decor is taken down, but at least we're making progress!
DeleteIt's beautiful! What an amazing thing to do. A couple of years ago we bought a similar style table at World Market and after feeding kids at it every day, figured out the grooves in it were too wide and food was constantly stuck in those grooves on the surface. Drove me nuts. My nice husband decided to surprise me by caulking the grooves while I was on a trip with the kids. Then he bought some paint and painted the top. :( Now it has a semi-sticky texture at times, especially when it's humid but food does not stay in the grooves. :) Problem is that to me, it looks like a home paint job and doesn't match the rest of the table. I've been wondering what to do/buy that will make the finish nice again. Should I used that stuff you used on top? Should I sand and re-paint first?? What do you think?
ReplyDeleteThat semi-sticky texture is such a pain!! I hate to say it, but I think you would be happiest if you sanded it down and started over. Chances are you won't be able to re-stain it (because you caulked the grooves), but you could probably paint it. I've been really happy with Benjamin Moore's Regal line of paint - it's pricey, but you'll probably only need a quart and it goes on really smooth. Then you could top it off with furniture wax. I know annie sloan has a line of paint and wax that several I know have used and they've loved it as well. Good luck!
DeleteAMAZING! It turned out awesome Kara!! I love it.
ReplyDeleteLOVE your table. You do amazing work. BUT I also love the Halloween houses behind your table. How did you make those?
ReplyDeleteI didn't make them - they were a window display in a store that I got my hands on when the store closed down. I've since made a pattern from them so I could duplicate them - I've thought it would be fun to make them from plywood and stake them in the yard outside. I'm never running short on projects!!
DeleteKara, any chance I could get the patterns to these? I love them! I am a huge fan of Halloween as well! Two years ago I made a life size witch for my yard. LOOOVE her. I'd love to do these houses too. Adorable!
DeleteThats funny you say that because I just made small versions for my table top last weekend! I created a small pattern without the windows and doors (just the silhouette), but not a big one yet. You can wait until I get around to making a big pattern, or I can send you a picture of each one and you can make a pattern...let me know!
DeleteI just found a small one to display but when you get around to making a big pattern, let me know!! :)
DeleteThat is so impressive. Just beautiful.
ReplyDeleteThank you!
DeleteLoVe it!! especially with the bench and different chairs. adds interest :)
ReplyDeleteBeautiful! Thanks for sharing so many cool ideas :) Keep with the excellent job.
ReplyDeleteBeautiful table! What did the finished dimensions end up being if you don't mind me asking?
ReplyDeleteThe final dimensions are 46"x96". Our dinning room was large enough for a big table, I made the dimensions based on cost savings using certain sizes of lumber.
DeleteAnd how thick did it end up being?
ReplyDeleteThe wood was just over 3/4 thick. I added the 1.5 inch piece of wood all the way around to make it look more like a slab of wood, more substantial.
DeleteVery nice job on both the table and bench! Stunning work! I'm about to start my first ever DIY project so I've been going over what it looks like you did and the plans on Ana-White.com a bunch of times. I can't figure out how you attached the table top to the legs and supports, and how you attached the 1.5" piece of wood all the way around the table top. It kinda looks like you used pocket screws on the supports to attach the table top from below and that you glued the 1.5" piece of wood to the tabletop. Is that right and/or did you do anything else?
ReplyDeleteAmazing! I am trying to build this table for my wife, however I have a couple questions if you don't mind helping me figure it out. I would like to know the size of the 3 wood pieces that make up the leg sections. ( Top cross piece, bottom cross piece, and the two side pieces). Also the overall width of the leg section and the distance between the two. Thank you so much for your help
ReplyDeleteAwesome!It's really very good piece of furniture.I love it.
ReplyDelete