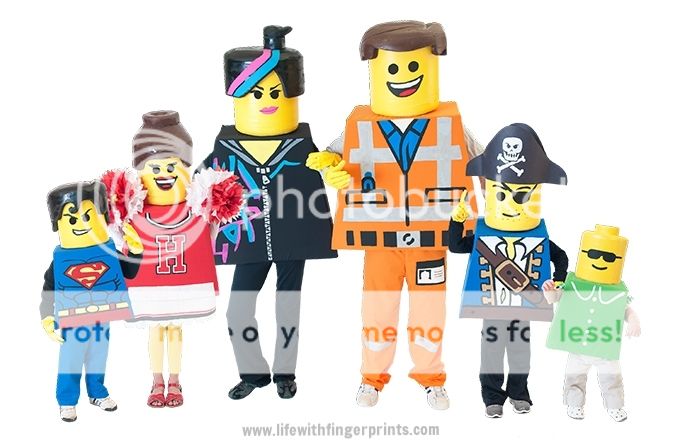
Back to our Halloween costumes...from last year! The Lego costume bodies were made from cardboard, large furniture boxes. I measured a lego mini figure and proportionally made measurements based on everyone's height to create a pattern. They were cut out using my jigsaw (yes, I used a saw for cardboard - it's what I'm comfortable with!) and taped together on the inside and the outside using Gorilla tape. I first tried duct tape but it didn't stick to the cardboard like the Gorilla tape did.

I initially thought I would quick spray paint all the bodies. But a trial run left me with undesirable results. The paint soaked into the cardboard and all you could see was the tape on the edges. Plan B: Cover the cardboard in fabric and paint the design on the fabric. Plan C: skip the bodies all together and wear clothing that represents the bodies. I was determined to make plan B work.
I didn't think covering the boxes in fabric would be extremely difficult. However, I'm not a seamstress and I basically had to create slipcovers for each box with odd angles. The results were a long shot from being perfect but they were 100% better than plan A and still better than plan C.
With fabric covered boxes, I used our video projector showing lego guys to trace designs on the boxes. I then went to work painting each design with craft paint.
 This was probably my favorite step out of the whole project. I remember Steve was out of the country the week before Halloween and all I had was cardboard box bodies somewhat put together before he left. As I painted late into each night he was gone, I saw the costumes coming together and it made excited. Each detail I painted added to authenticity and it wasn't the chore I thought it would be. The task was more than rewarding and I watched some great movies in the process.
 My mom came into town while Steve was gone and was with me while I painted a few of the bodies. She shook her head in disbelief that I was spending as much time as I was on each body. And although the word "crazy" escaped her lips more than once in describing the process (or perhaps referring to me in general) she pitched in and helped me out. Two of the costumes needed some pants to go with their bodies - and she sat at the sewing machine and whipped them out. Where was she when I was covering the boxes?!

By the time Steve arrived home just in time for Halloween, he was amazed by the finished product. The kids continually tried them on and loved them. The bodies and the heads sat on our dining room table in hopes of not being ruined before the big day and everyone that came to our house and saw them could not wait to see them in action.


Who could've predicted that we would have record heat (breaking 100) on Halloween. Those costumes were not meant for summer weather and our heads were a bit toasty. But the kids were troopers (aside from Cannon who was sick that evening and didn't wear a costume at all!)
Just about everywhere we went - we were celebrities - we took a lot of pictures with random people. It was a fun night.


After Halloween was over they sat back on the dining room table until I could figure out what to do with them. I have high hopes of wearing them again someday - so they carefully sit wrapped in garbage bags in the attic awaiting to make their grand re-entrance!


These costumes are amazing! Such a lot of work went into them, but the result is really astonishing! I hope you will be able to use them again. These costumes really should be seen!
ReplyDeleteMe too! I tried convincing the kids we should wear them again this year and no one liked my idea!
DeleteI don't think I have ever seen costumes so amazing! Great job!
ReplyDeleteThanks!
DeleteThese costumes are awesome. I wish I could make one for my son, but I truly don't think I could figure out the head. You're such a fun mom to do this!
ReplyDeleteI had no idea what I was getting into when I started, but starting is half the battle!
DeleteWow these are amazing! You are very talented!
ReplyDeleteThanks!
Delete