Showing posts with label Building Projects. Show all posts

Thursday, February 5, 2015

DIY Walnut Chalkboard...

I've worked with pine, poplar and maple and each served its purpose for a specific project but I have a new love; walnut. It has the most beautiful grain and color and I wish I could afford to build every project using it.

You can't buy walnut at home depot which meant I found myself at a local hardwood store where the man working was anything but helpful. Evidently a woman with a small child in tow isn't his typical customer. He was so helpful (sarcasm), at one point he asked another customer (who obviously buys a lot of wood there) to help me while he stood at the desk. Awesome. I think I had steam coming out of my ears. No, I wasn't on an errand from my husband. Yes, I have purchased hardwood before and I know how it works. I was so mad I didn't purchase wood that day and I was bound and determined to find another place to give my business to. Wouldn't you know it, it's the only one in the area close. Two days later, I swallowed my pride, took my baby back to the store and made my purchase without making eye contact. That'll show him!

I had him square one side (which he ended up squaring the wrong side - go figure), so I could run it through the table saw for my finished size.
Life with Fingerprints: DIY Walnut chalkboard using Kreg Jig, Graco TruCoat, Rustoleum Chalkboard paint
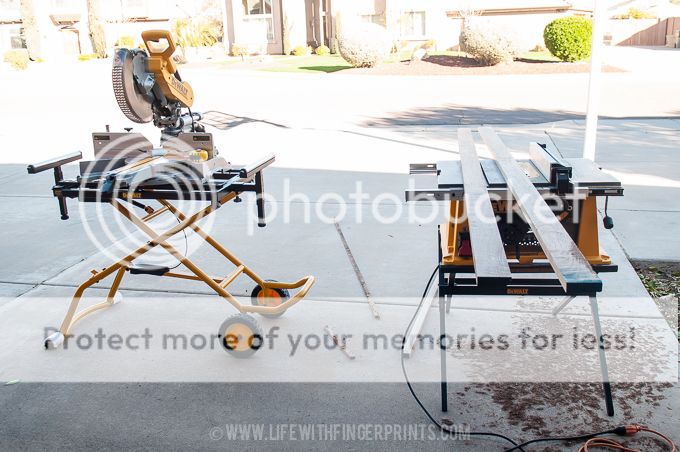
I also used the table saw to rout out the back side so the chalkboard would fit in it. This was yet another reminder that I need to buy a router because it took forever, especially since I wasn't cutting through the entire piece. Painful process.
Life with Fingerprints: DIY Walnut chalkboard using Kreg Jig, Graco TruCoat, Rustoleum Chalkboard paint
As usual, my Kreg jig made it's appearance and I joined the corners with glue and some screws.
Life with Fingerprints: DIY Walnut chalkboard using Kreg Jig, Graco TruCoat, Rustoleum Chalkboard paint
I've found I'm always happier with my joints if I pipe clamp them while inserting the screws. Much tighter fit.
Life with Fingerprints: DIY Walnut chalkboard using Kreg Jig, Graco TruCoat, Rustoleum Chalkboard paint
My favorite part about working with walnut - because the wood is so beautiful in its raw form - there's no need for stain. I did four coats of wipe-on poly to seal it and that's it.

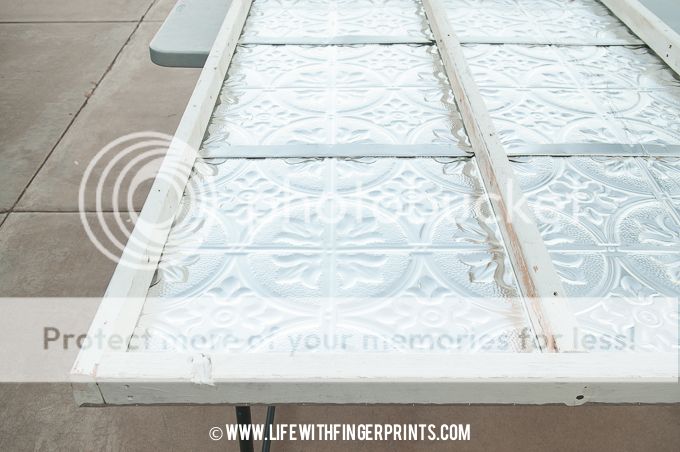
I wanted a smooth chalkboard surface. I used birch plywood and I sprayed Rustoleum Chalkboard paint with my Graco TruCoat. This is one of those times that I almost convinced myself to paint it by hand because I didn't want to worry about clean-up on such a small project but that sprayer is so much nicer and even with cleanup it's way faster. The only disadvantage: You use a lot more paint.
Life with Fingerprints: DIY Walnut chalkboard using Kreg Jig, Graco TruCoat, Rustoleum Chalkboard paint
Following the instructions on the chalkboard paint, after you've painted the surface you need to rub chalk over the whole chalkboard. It makes it so when you write on it the first time, you're able to erase it.
Life with Fingerprints: DIY Walnut chalkboard using Kreg Jig, Graco TruCoat, Rustoleum Chalkboard paint

And now it sits in our kitchen lovely and full of little fingerprints!

Thursday, January 29, 2015

DIY Construction Paper Organizer...

I'm a sucker for just about anything at Costco. 5lb bag of chips. Of course. 30 pairs of socks...you can never have too many. And who can't use a sharpie in every color of the rainbow? Like I said, I'm a sucker. At the beginning of the school year I was perusing the isles when I came across the largest pack of construction paper I had ever seen. My kids love crafts and we go through card stock like there's no tomorrow so this was right up our alley.

Immediately after my purchase I had buyers remorse. We didn't really need that much paper and I came to the realization that it was going to be scattered through the house. It sat on my laundry room counter for months while I went back and forth. Ultimately, Hunter had a school project that required several sheets of paper and we busted the package open and he chose his colors. I was trying to keep it neat and tidy, so it stayed on the counter. Then Hallie needed some paper and pulled out a few and before long the nice tidy stack found its way to the game/crafts closet. It didn't take long for my nice stack to turn on it's side and start to create chaos. See it there:
Life with Fingerprints: DIY Construction Paper Organizer
And no matter how many times I straightened it I couldn't get it to stay clean. In my annual beginning of the year purging and cleaning of the house I resolved to find a solution. I bought several bins and boxes and nothing worked like I needed it to. So I turned to the garage and my never ending piles of scrap wood and pulled out the table saw.

I cut two sides and a back piece of wood and cut 9 sets of grooves in each (using the table saw) and cut a top and bottom
Life with Fingerprints: DIY Construction Paper Organizer
I glued, clamped and nailed the sides to the back and attached the tops and bottoms as well.
Life with Fingerprints: DIY Construction Paper Organizer
Once dry, I was able to slide in each shelf - which is adjustable, shelves can be removed for larger stacks of paper.
Life with Fingerprints: DIY Construction Paper Organizer
I returned the stack of beautifully organized paper back to the closet. Yes, it looks like it belongs in a 1st grade classroom. But what home couldn't benefit from a little paper organization? It makes me happy. It makes me even happier to know that my kids have pulled out papers every day and it still looks like this!
Life with Fingerprints: DIY Construction Paper Organizer
The best part is I didn't even paint or stain it. I like the natural wood and it wasn't worth pulling a paintbrush out!
Life with Fingerprints: DIY Construction Paper Organizer

Thursday, January 15, 2015

DIY Ceiling Tile Art...

My friend had a few leftover ceiling tiles from her new kitchen and I put them to good use. For almost a year, they hung, attached to a simple 2x4 frame.
Life With Fingerprints: DIY Ceiling Tile Art
You can see it in our Back-to-school dinner.
Life With Fingerprints: DIY Ceiling Tile Art
But the edges were rough and it looked unfinished and not quite what I needed for the space. So the ceiling tiles received a makeover.

I built a large frame using 1x4 and 1x3 boards. Using my Kreg jig I made a large rectangle with the 1x4s and then made it look more substantial and thicker by adding 1x3s.
Life With Fingerprints: DIY Ceiling Tile Art
Of course after making the frame, it sat in the office as I debated stain or paint. Once I settled on paint, it sat for another two weeks while I figured out a color. I ended up going to my paint stash and picking up the color I originally used for the barn door (I decided against it because I wanted the door to have a little punch!). The color wasn't great for the door, but it was perfect for the frame.
Life With Fingerprints: DIY Ceiling Tile Art

Sunday, January 11, 2015

Homemade Christmas 2014...part two...

I usually have my homemade gifts done far before my other shopping is complete, but this year I was a little off. I thought and planned for one larger homemade gift for the all the kids. But it wasn't working out so I had to come up with some individual gifts for them. Here's how the gifts went down this year:

I made Hallie a knit pencil skirt - the same pattern she made over the summer which has become her very favorite skirt.
Life with Fingerprints: Homemade Christmas gifts for everyone in the family; T-shirt quilt, blurb books, sewing and building

Hunter is in Kindergarten and is starting his fascination with writing stories and drawing pictures. This roll is large enough it will probably last for years!
Life with Fingerprints: Homemade Christmas gifts for everyone in the family; T-shirt quilt, blurb books, sewing and building

Bennett loves to hear stories about when he was younger and loves to look through the blog and recognize himself. I printed off pictures - birth to present - of him. Some have his siblings a few have us or grandparents, but mostly it's him and he loves it.
Life with Fingerprints: Homemade Christmas gifts for everyone in the family; T-shirt quilt, blurb books, sewing and building

Cannon has no idea Christmas even took place - but he still got a gift! He'll thank me later!
Life with Fingerprints: Homemade Christmas gifts for everyone in the family; T-shirt quilt, blurb books, sewing and building

And because Blurb is my absolute favorite - Steve also received a book: 2010 Blog book. Yes I'm behind. At nearly 400 pages they take a while to layout. It's really more of a family gift as it's an account of us, but Steve gets to open them each year when I complete one. I realize at this pace I'll always be four years behind, I'm hoping to make up ground with an extra book this year!
Life with Fingerprints: Homemade Christmas gifts for everyone in the family; T-shirt quilt, blurb books, sewing and building

My favorite gift I made (next to the Nativity puzzle of course) was Steve's t-shirt quilt.
Life with Fingerprints: Homemade Christmas gifts for everyone in the family; T-shirt quilt, blurb books, sewing and building
I've been saving these shirts for years for this exact purpose. I hid them in our house in Milwaukee. I hid them in this house. I hid them driving up to Idaho so I could work on it last summer. I'm happy for it to come out of hiding. Each shirt means something and it tells the story of him: Shirts from high school, mission, our dating years, family trips, college, jobs (at least his first job).
Life with Fingerprints: Homemade Christmas gifts for everyone in the family; T-shirt quilt, blurb books, sewing and building
He was surprised. Shirts he had long thrown away suddenly back in his hands as well as the memories. The whole reason I look forward to homemade gifts!

Thursday, December 11, 2014

Christmas crafts...part 5...

We're getting closer to Christmas which means my crafting is coming to a halt as I prepare to send out Christmas cards, attend programs and neighborhood gatherings, etc. Here's my final craft for this holiday season: A 3 1/2 foot star that sits atop the entertainment center. This was the fastest and cheapest project out of all the projects this week. $4.50 and thirty minutes and that includes staining.
Life with Fingerprints: DIY Holiday Star, Christmas Craft
I bought the cheapest 1x2 wood that Home Depot sells. Less than $2 a piece. I cut 5 identical pieces and laid them out on the driveway to form the star, no fancy angles, just 90 degree cuts. Once I had it lined up, I nailed (with my nail gun but a hammer would be equally as easy).
Life with Fingerprints: DIY Holiday Star, Christmas Craft
Due to the nature of semi-thick pieces sitting on top of each other, the last piece that I nailed wouldn't lay totally flat. So I used a scrap piece to shim it so I could nail it flat.
Life with Fingerprints: DIY Holiday Star, Christmas Craft
Within 5 minutes I had the whole thing stained and my little sidekick never left my side!
Life with Fingerprints: DIY Holiday Star, Christmas Craft
Most the projects I showcased this week all reside in the entertainment center (that was nonexistent last year) - it took a lot to get it holiday ready!


Check out the other posts from Christmas Craft week
Christmas Crafts Part 1
Christmas Crafts Part 2
Christmas Crafts Part 3
Christmas Crafts Part 4
Christmas Crafts Part 5

Thursday, November 13, 2014

Easy shelves...

These are my favorite shelves - three pieces of wood and done in no time. I made two 10 foot shelves for my son's room only to change my mind. It's not easy finding a place for two 10 foot shelves in your house. I cut one in half and found the perfect wall in my office for two 5 foot shelves.
Life with Fingerprints: DIY Photo Ledge/Shelf
Of course the shelves sat empty for a time because I couldn't figure out what I wanted in my office space. But they're full now and they make me happy.

I love this wall because it embodies who I am. Some of my favorite photos, favorite people, favorite places, favorite memories and my favorite collection of cameras. Including my dad's old Canon SLR. Life with Fingerprints: DIY Photo Ledge/Shelf
Life with Fingerprints: DIY Photo Ledge/Shelf

Sunday, October 19, 2014

The entertainment center...

Back in February, I took on the project of all projects building a 12ft by 8ft entertainment center with my dad. And after it was built, it sat empty because although I have crazy cool vision for creating a project, I never feel confident in the accessorizing department. Every once in a while I would come across something I liked and months later we have a semi-accessorized unit!

But lets start from the beginning, a couple months after moving in:
Life with Fingerprints: DIY Entertainment Center, building project, media center

A year later we finally got around to replacing the mauve carpet, painted the walls and hung drapes:
Life with Fingerprints: DIY Entertainment Center, building project, media centerLife with Fingerprints: DIY Entertainment Center, building project, media center
At the beginning of this year I flew my dad down and we spent the most exhausting 7 days making this come to life. I still look at it sometimes and I'm amazed that the drawing I made two years ago actually came to be. I learned so much in this process and I'm just sick enough that I would do it again!
Life with Fingerprints: DIY Entertainment Center, building project, media center

Here's our step-by-step process:
DIY Entertainment Center - Day 1
DIY Entertainment Center - Day 2
DIY Entertainment Center - Day 3
DIY Entertainment Center - Day 4
DIY Entertainment Center - Day 5
DIY Entertainment Center - Day 6
DIY Entertainment Center - Day 7
Related Posts Plugin for WordPress, Blogger...